Nondestructive testing of mill rolls
Abstract. To obtain data on the depth distribution of flaws in backup rolls, we have analyzed the results of manual ultrasonic testing of over 300 rolls at rolling mills. On the base of the statistical analysis were obtained the main reasons of destruction of working and backup rolls. Our results show the importance and necessarity of inspection the entire volume of rolls, including roll necks.The application of automated ultrasonic and eddy-current testing is a feasible way for decreasing the rate of emergency breakdowns of mill rolls.
"RollScope"-type multichannel devices developed for the automated nondestructive testing of mill rolls. The inspection results are displayed as 3D-type scanning defectograms.
Introduction
The available data and foreign experience shows that surface and subsurface flaws, cracks in particular, constitute are one of the main reasons of the rolls breakup. According to statistics, 95% of roll breakups is a result of surface and subsurface flaws, and only 5% of breakups are due to internal flaws [1, 2].
The decrease of mill rolls destruction which cause a material losses will allow to aggrandize the effectiveness of mill products. The main attention devotes to sheet rolling mills.
At present time a quality questions becomes more and more important and causes an increasing attention to automatic machines for mill rolls control. The alternative to automatic control can be human monitoring which have some disadvantages: low assurance, small efficiency, asperities in control results figuration. The supplementary advantage of automatic control is decreasing role of human factor during the control and elaboration process.
Distribution of flaws in supporting rolls
To obtain data of the depth distribution of flaws in back-up rolls, we have analyzed the results of ultrasonic testing of over 300 rolls at rolling mills 1700 and 2800 inlast five years.
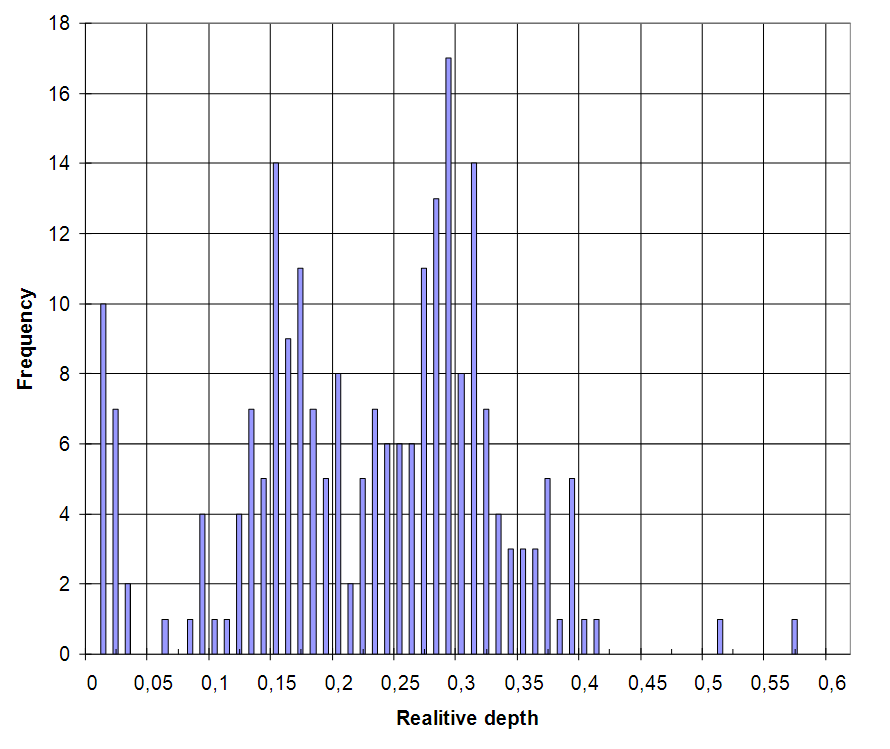
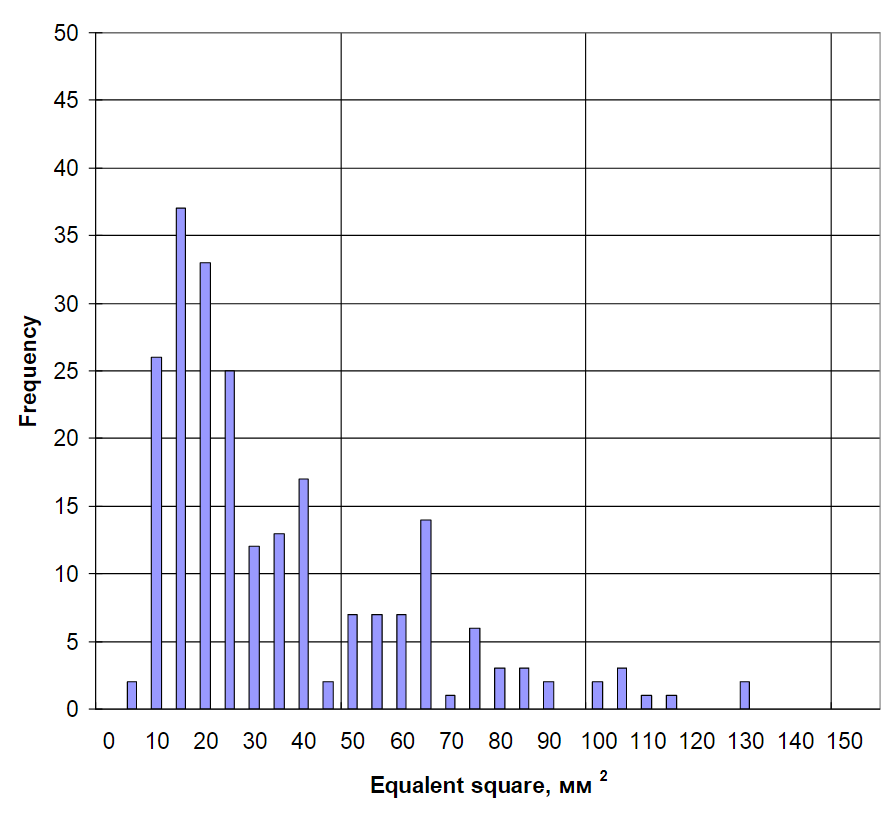
Figure 1 describes defects allocation by relative depth in mill rolls. The magnitude of depth was obtainedas relative by division on defective mill diameter. Figure 2 describeshistogram of defects allocation by their equivalent values during backup roll control.

Figure 1. Distribution of flaws in backup roll mill

Figure 2. Distribution of flaws in backup roll by sizes
We were perform research when possible one and two-sheet cast irons rollsultrasonic control on 0,6MHz 1MHz, 2MHz and 5MHz frequency.In consequence ofexperimentation cyclewe found what ultrasonic control of all types of backup rolls possible on 1 MHz frequencyinclusively. In such case obtains clear backwall in all rolls kinds. In relation to cast irons types it’s possible to pursue control on a higher frequency. For
example, it was fixed a backwallecho in 5 MHz frequency. Therethrough we can suggest to use 1 MHz frequency for all roll types control.Eddy-current testing allows surface flaws (such as spalling cracks, deteriorating cracks, bruises, and burns from a grinding wheel) to be detected in a reasonable time; this makes possible to prevent the chipping and deterioration of rolls.
Internal flaws in rolls are detected more efficiently by means of ultrasonic testing. Statistics over many years shows that manual ultrasonic testing does not ensure the detection of all intolerable flaws. Moreover, the productivity of the process is small, and documenting of the testing results is a time-consuming procedure.
The application of automated ultrasonic and eddy-current testing is a feasible way for decreasing the rate of emergency breakdowns of mill rolls.
Development stand
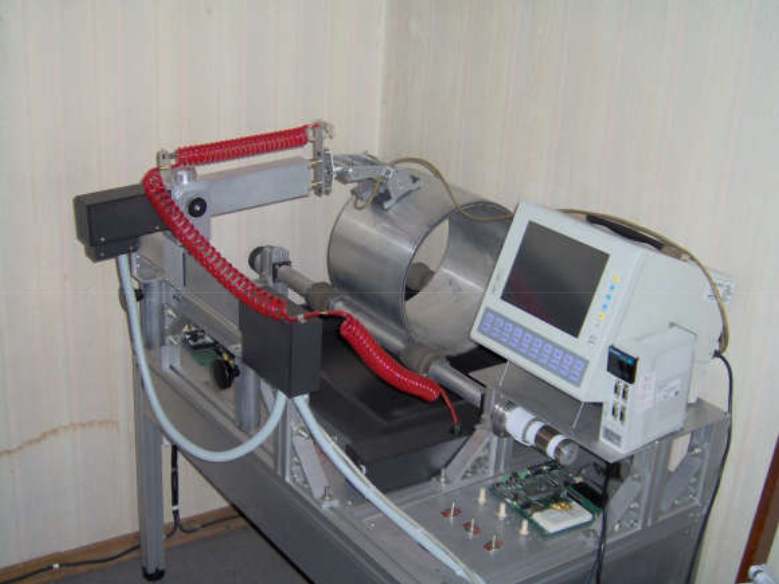
We were developing a stand for methodical and hardware-based measure elaboration for automated machine (Fig. 3). The mill roll was imitated bythick-walled aluminum tube.The line speed converts from 0 to 2000 mm/sec. The lengthwise displacement speed of the scanning system changes from 0 to 20 mm/sec.
For picking-up coordinates were used total absolute encoder.It was settled to useand created a wirelessLAN. The first advantage of this method is in using ISM band(2.4GHz). The second in small power of emission which lower another electronic equipment disturbances. It was obtained a high translation speed – till 1 Mb/sec. On this stand was made a big experimental work which allowsto determine the best conditions for ultrasonic and eddy current control.

Figure 3
Results
The author in cooperation with such companieslike ''DEMAS'' and "TSNIITMASH" (Russia) has developed the type automated devices for nondestructive testing mill rolls –and named it RollScope.
The device is designed monoblock unit, which is based on a free area of the frame (plate) of a roll-grinding machine. It’s also has a detachable scanning mechanism installed on a sliding carriage with the acoustic unit.
The one-channel device RollScope-EC is intended for the automatic monitoring of the working and back-up mill rolls. It is designed as a tool for a grinder. The operating procedure is simple for a grinder. It does not require the special knowledge and can be used not only by an expert on non-destructive testing. The device employs an eddy-current probe. The eddy-current probe detects surface flaws and subsurface flaws located down to 5 mm deep. Both structural changes and cracks can be detected. The device ensures a high scanning rate (up to 2 m/s). A working roll and back-up roll can be tested from 5 to10minutes.
The two and more-channel device offers the largest functionality. It has been designed for the expert testing of rolls and can be used for inspecting thick-walled pipes, cylindrical items, etc.
To increase the probability of detecting differently oriented flaws, the device uses four ultrasonic transducers with different input angles. Angle transducers with input angles from 40 to 80 ° are intended for detecting bulk and vertically-oriented flaws at depths down to the axial line of the roll body.
The multichannel flaw detector features is a system of temporary sensitivity adjustments. Its is equipped with a color display. It has a simple to use human-machineinterface. The same scanning range is used to test roll necks and bodies. This makes it possible to detect flaws in roll bodies while roll necks testing.
The software of the device ensures the real-time processing. If required, it is possible to turn any channel on or off. Roll necks and bodies are inspected separately. During an inspection, the outline of a roll is output to the display together with an image of the acoustic unit moving in real time.
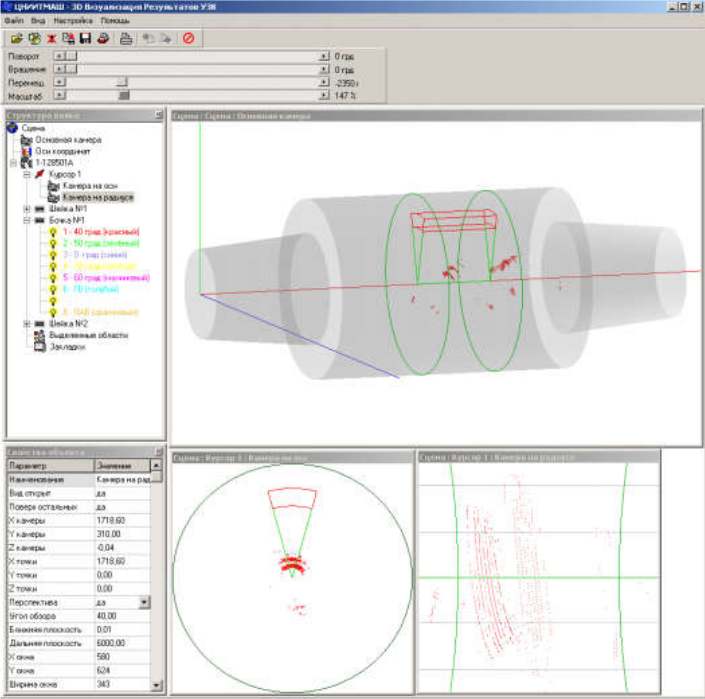
The computer system acquires data from the ultrasonic transducers and from the position sensors. After the procedure has been finished the data automatically transferred to separated computer. The results were analyzed in a separate computer. To increase the testing productivity, the testing data are automatically transferred via a wireless localnetwork to a computer and turned in to 3D model of the roll.
The software, based on the obtained results, working under "Windows" plots a 3D model of the roll. The visualization program makes it possible to rotate the 3D model in three dimensions. It is also possible to obtain any cross section in a radial plane. An NDT inspector can measure and select zones with flaws and determine their areas. All selected cross sections and views of harmful flaws are stored. After studying the results of testing at different sensitivity levels, an NDT inspector prepares a decision. All testing results are stored on the hard disk of the computer and can be recorded on a CD or DVD disk.

Figure 4. 3-D visualization program
Conclusions
Inner and surface defects were detected through nondestructive control results. It has been created an automatic machine for mill rolls nondestructive control. The main its advantages are in using wireless technology and 3-D images construction.The five-channel device is used by ''Severstal'' company (Russia) at the present time. Its buying facility charge recovered in one year.
